$ oc login https://master.example.com:8443 -u admin -p admin
$ oc new-project backend-services微服务管理
Table of Contents
微服务介绍
本部分部署 https://github.com/redhat-china/rhoar-getting-started 部分描述的微服务到 OpenShift。
| 名称 | 框架 | API 路径 | 说明及部署文档 |
|---|---|---|---|
inventory |
vertx |
|
|
booking |
nodejs |
|
|
fruits |
spring |
|
|
cooking |
thorntail |
|
1. 创建 backend-services 工程
2. 部署微服务
$ cd rhoar-getting-started/vertx/
$ mvn package fabric8:deploy -Popenshift

$ cd rhoar-getting-started/springboot/
$ mvn package fabric8:deploy -Popenshift

$ cd rhoar-getting-started/thorntail/
$ mvn package fabric8:deploy -Popenshift

$ cd rhoar-getting-started/nodejs/
$ npm run openshift
3. 微服务测试
# curl http://inventory-backend-services.apps.example.com/api/inventory
{"content" : "RHEL 7.6"}
# curl http://inventory-backend-services.apps.example.com/api/inventory?name="OpenShift"
{"content" : "OpenShift"}

# curl http://fruits-backend-services.apps.example.com/api/fruits
[{"id":1,"name":"Cherry"},{"id":2,"name":"Apple"},{"id":3,"name":"Banana"}]
# curl http://fruits-backend-services.apps.example.com/api/fruits/1
{"id":1,"name":"Cherry"}

# curl http://cooking-backend-services.apps.example.com/api/cooking
{"content":"Egg"}
# curl http://cooking-backend-services.apps.example.com/api/cooking?name=Par
{"content":"Par"}

# curl http://booking-backend-services.apps.example.com/api/booking
{"booking":"ROW10086"}
# curl http://booking-backend-services.apps.example.com/api/booking?name=ABC123
{"booking":"ABC123"}
Open API 文档
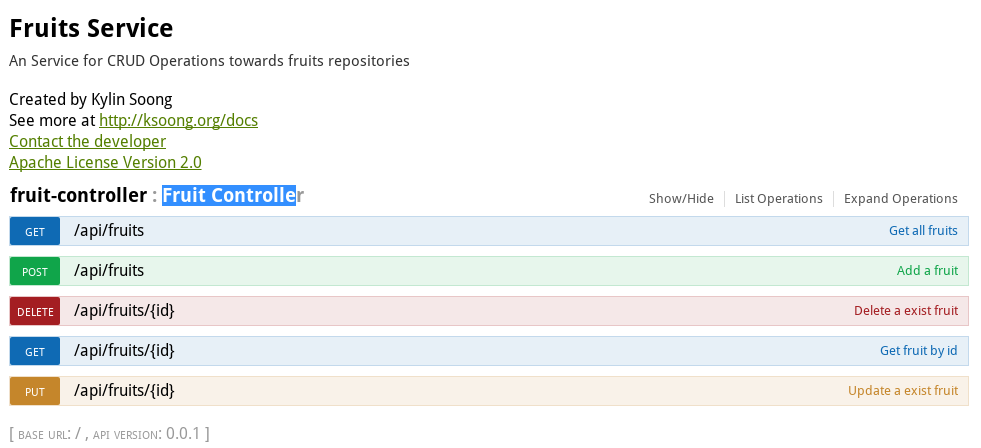
Fruits 服务定义了 Swagger 2.0 文档
将上面链接中内容导入 http://editor.swagger.io, 可以看到如下 API 编辑界面
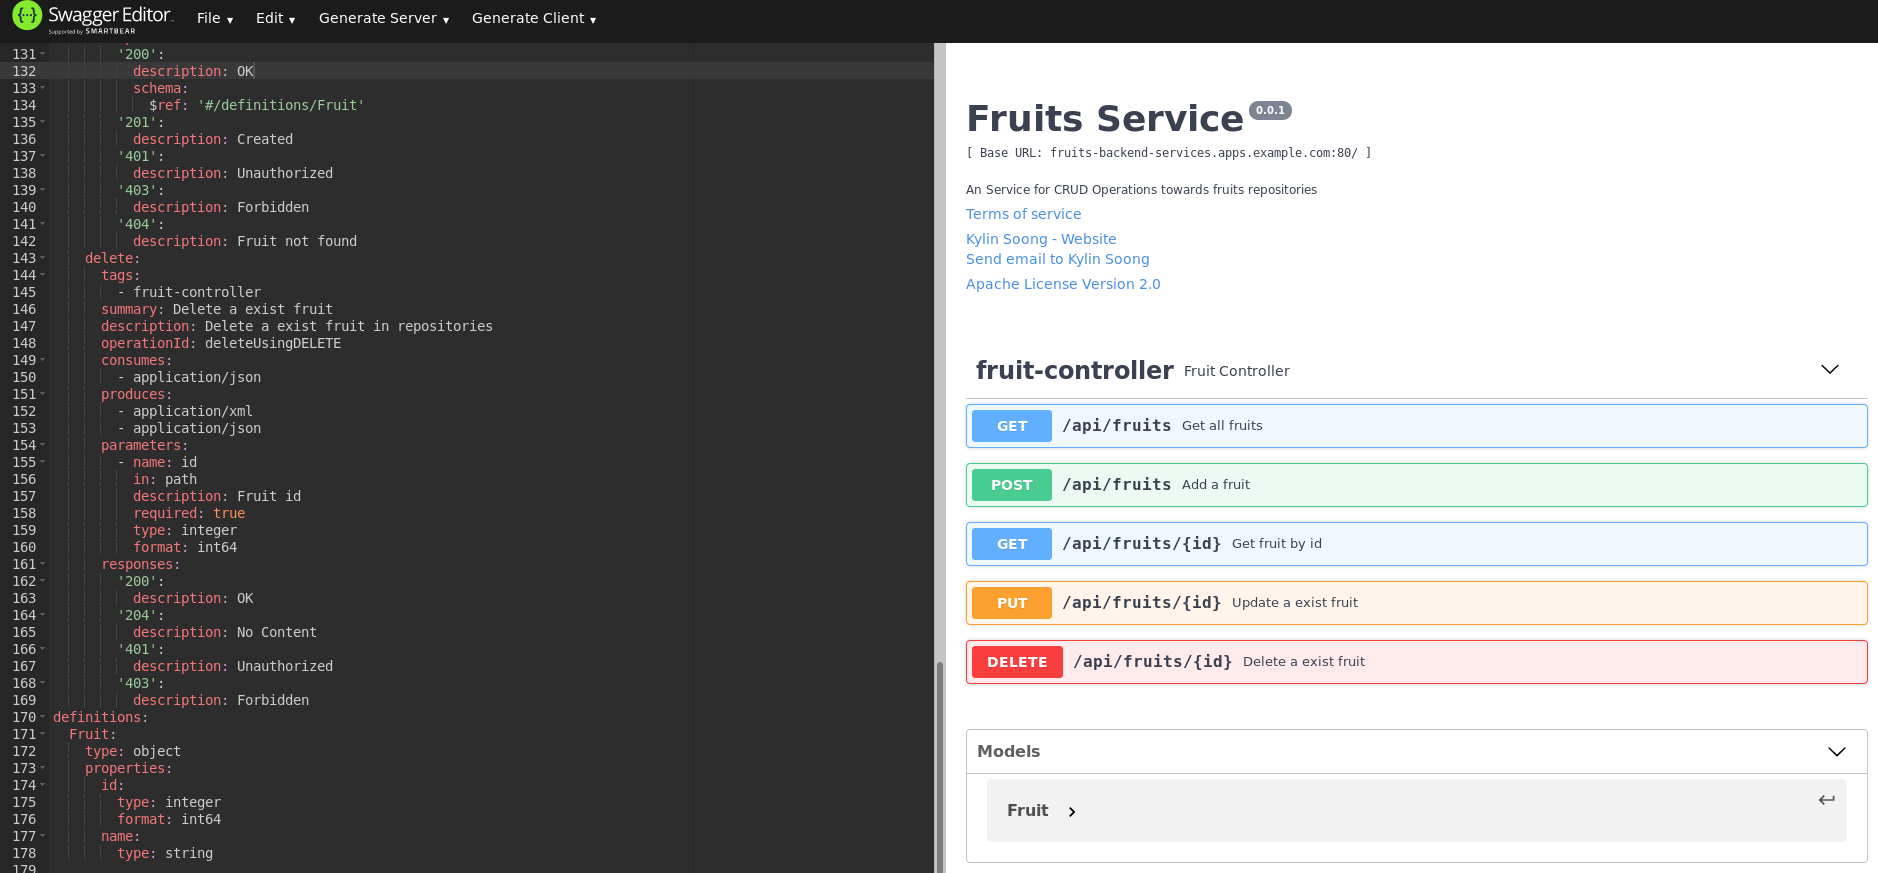
在如上界面上依次测试 GET、POST、PUT、DELETE 等方法。
Cooking 服务管理
目的
本部分说明如何通过 3Scale 管理微服务。具体要求包括:
-
每一个服务都有一个 basic plan 和一个 premium plan
-
basic plan 每小时只能访问 10 次,且不能访问某些 CRUD 操作
-
premium plan 没有任何限制
-
-
服务必须以安全加密的方式进行访问
-
Metrics 应该详细设定
API Gateway 上创建 Stage 和 Prod 路径
|
Note
|
本部分内容可选择,如果不创建,则在后续服务集成步骤在 3Scale 界面点击创建。 |
# oc create route edge cooking-apicast-prod --service=apicast-production --hostname=cooking-apicast-prod.apps.example.com -n 3scale-amp
# oc create route edge cooking-apicast-staging --service=apicast-staging --hostname=cooking-apicast-staging.apps.example.com -n 3scale-amp

# oc get route -n 3scale-amp | grep cooking
cooking-apicast-prod      cooking-apicast-prod.apps.example.com                      apicast-production        gateway   edge          None
cooking-apicast-staging   cooking-apicast-staging.apps.example.com                   apicast-staging           gateway   edge          None
创建 Cooking API
-
登录 3Scale 管理门户
-
选择
Dashboard→APIS -
点击
New API链接,开始创建一个 API -
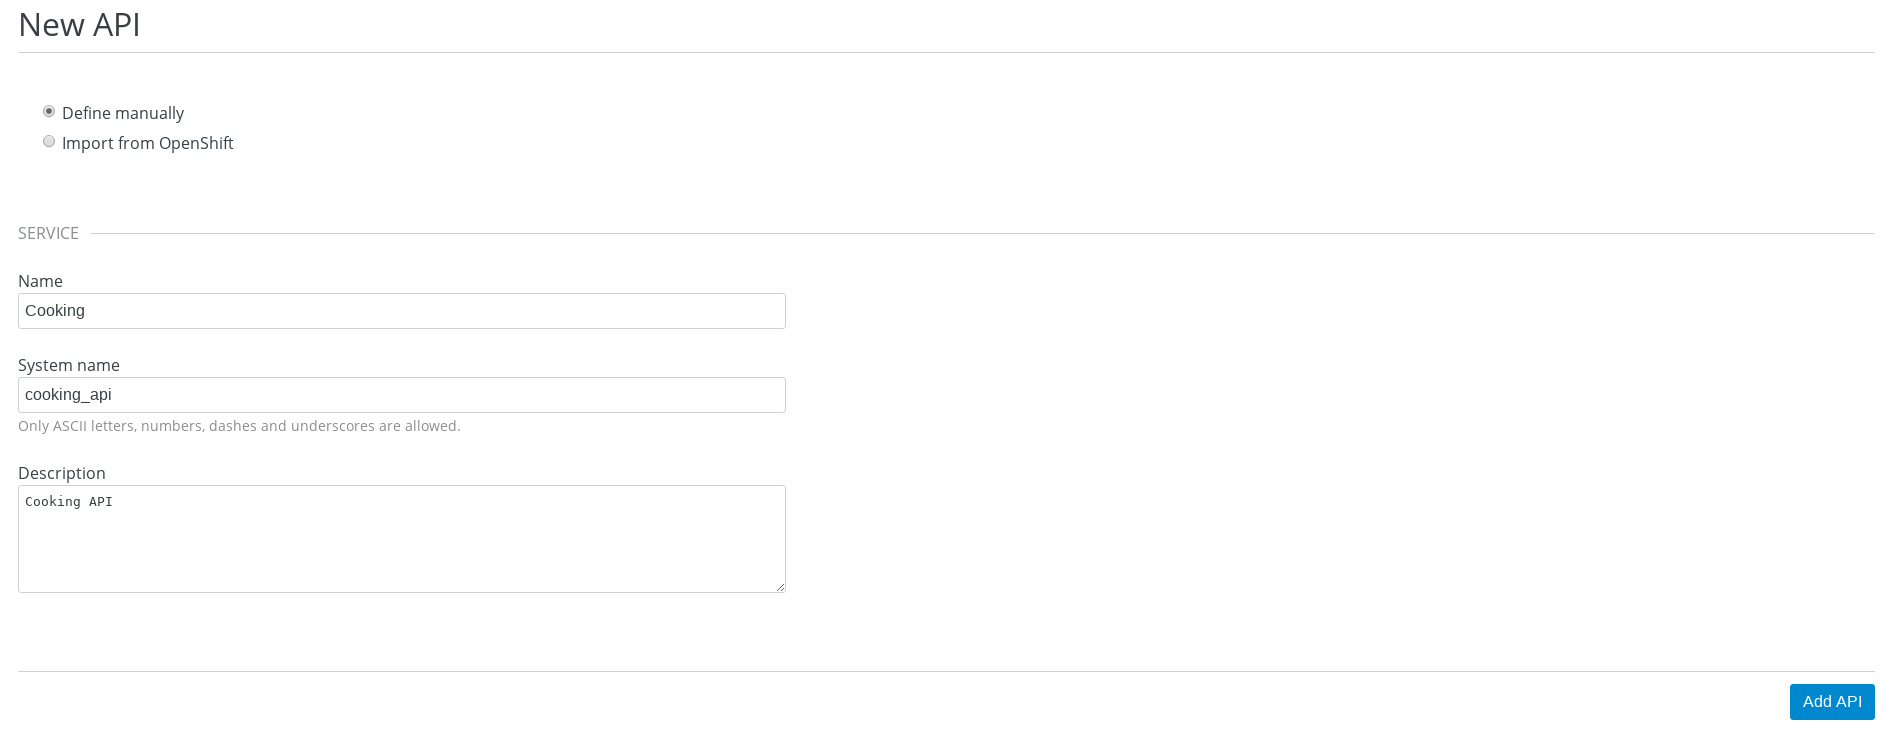
在新弹出的对话框中输入
-
Name -
Cooking -
System name -
cooking_api -
Description -
Cooking API
-
-
点击
Add API按钮完成创建
定义 Methods 及 Metrics
在管理门户中选择 API:Cooking → Integration → Methods & Metrics,
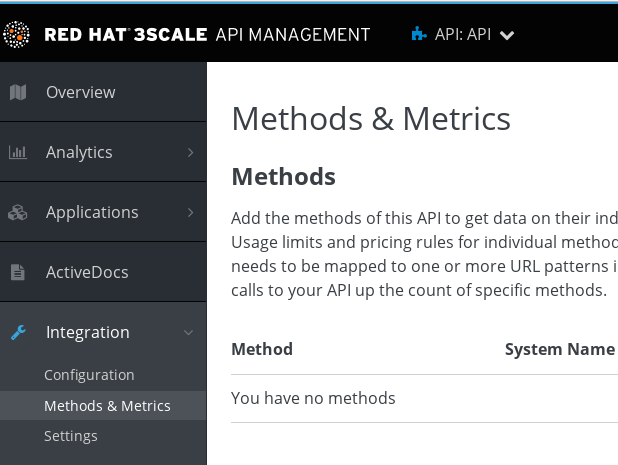
在 Methods & Metrics 视图下可以定义 Methods 及 Metrics,Methods 是和后端 API 进行映射,Metrics 是指管理策略的定义,具体包括:Hits、megabytes、CPU time 等。
-
在 Methods 列表右端点击
New method -
在弹出的界面中输入:
-
Friendly name- GET /cooking -
System name- get_cooking -
Description- cooking GET endpoint that returns list of cookings
-
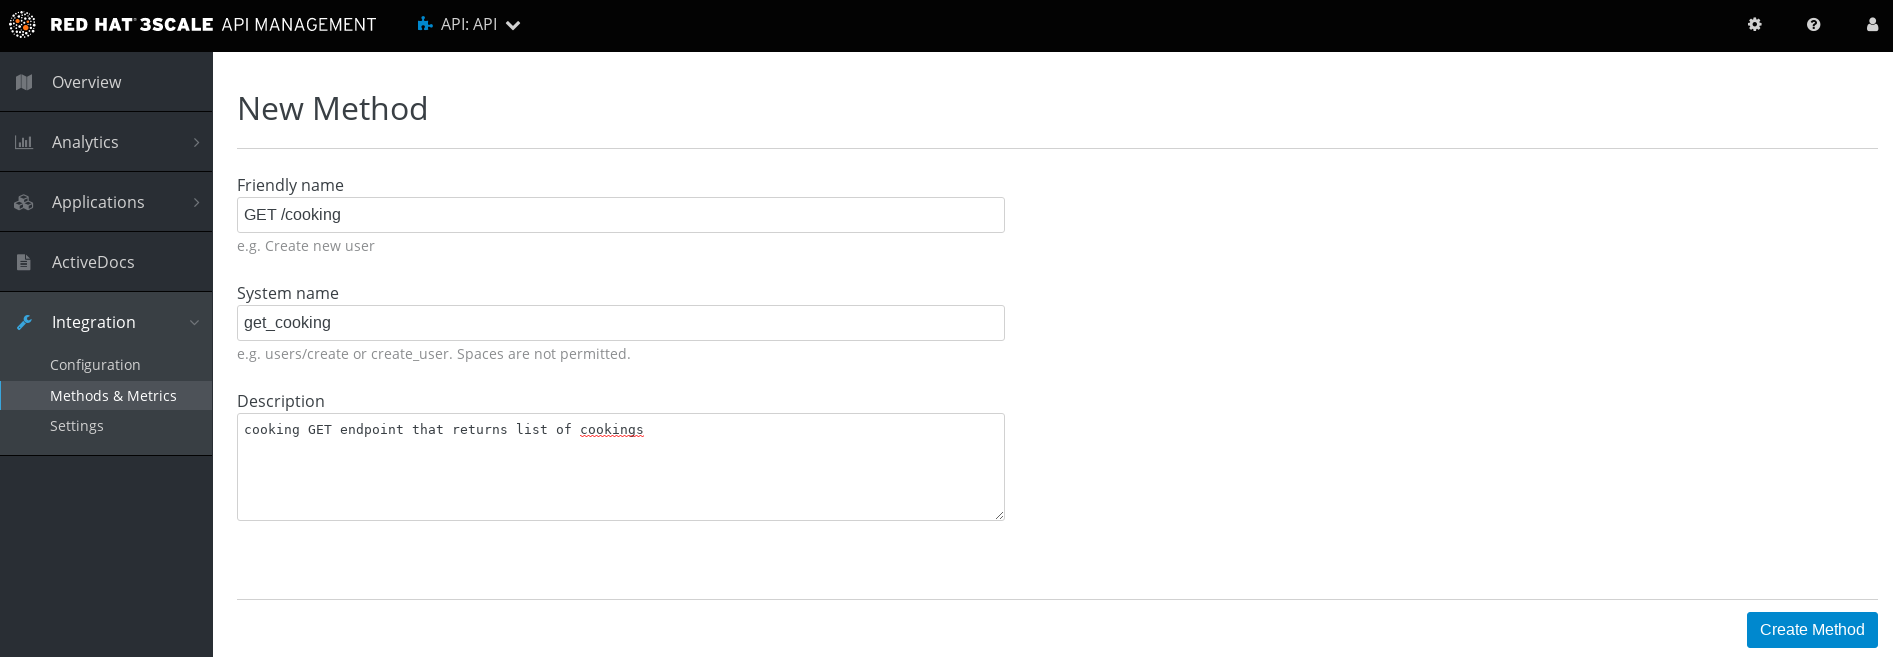
 点击 `Create Method` 按钮
* 创建完成后 Methods 列表中会有一个 GET /cooking, 出现。
* Metrics 定义使用默认定义,仅收集 Hits 数据,及只收集 API 访问次数的记录。
创建 Application Plan
创建 Basic Application Plan
-
登录管理门户,选择
API:Cooking→Overview -
在 Published Application Plans 部分,点击
Create Application Plan -
Name栏输入 Cooking Basic -
System name栏输入 cooking_basic -
Applications require approval?选择 Y -
点击
Create Application Plan按钮创建 Plan

-
在 Application Plans 列表中点击
Cooking Basic,打开新创建的 Application Plan -
点击
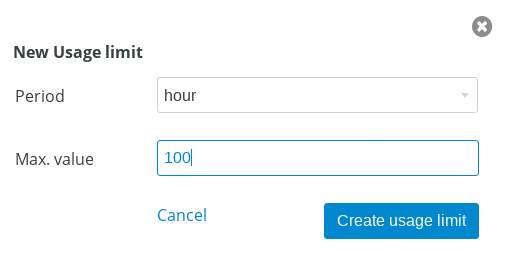
GET /cooking→Limits (0)→New usage limit创建一个新的限制
-
Period栏选择 Hour -
Max. value栏选择 100 -
点击
Create usage limit
创建 Premium Application Plan
-
登录管理门户,选择
API:Cooking→Overview -
在 Published Application Plans 部分,点击
Create Application Plan -
Name栏输入 Cooking Premium -
System name栏输入 cooking_premium -
Applications require approval?选择 Y -
点击
Create Application Plan按钮创建 Plan

创建开发者账户
-
登录 3Scale 管理门户
-
选择
Audience→Accounts→Listing -
点击
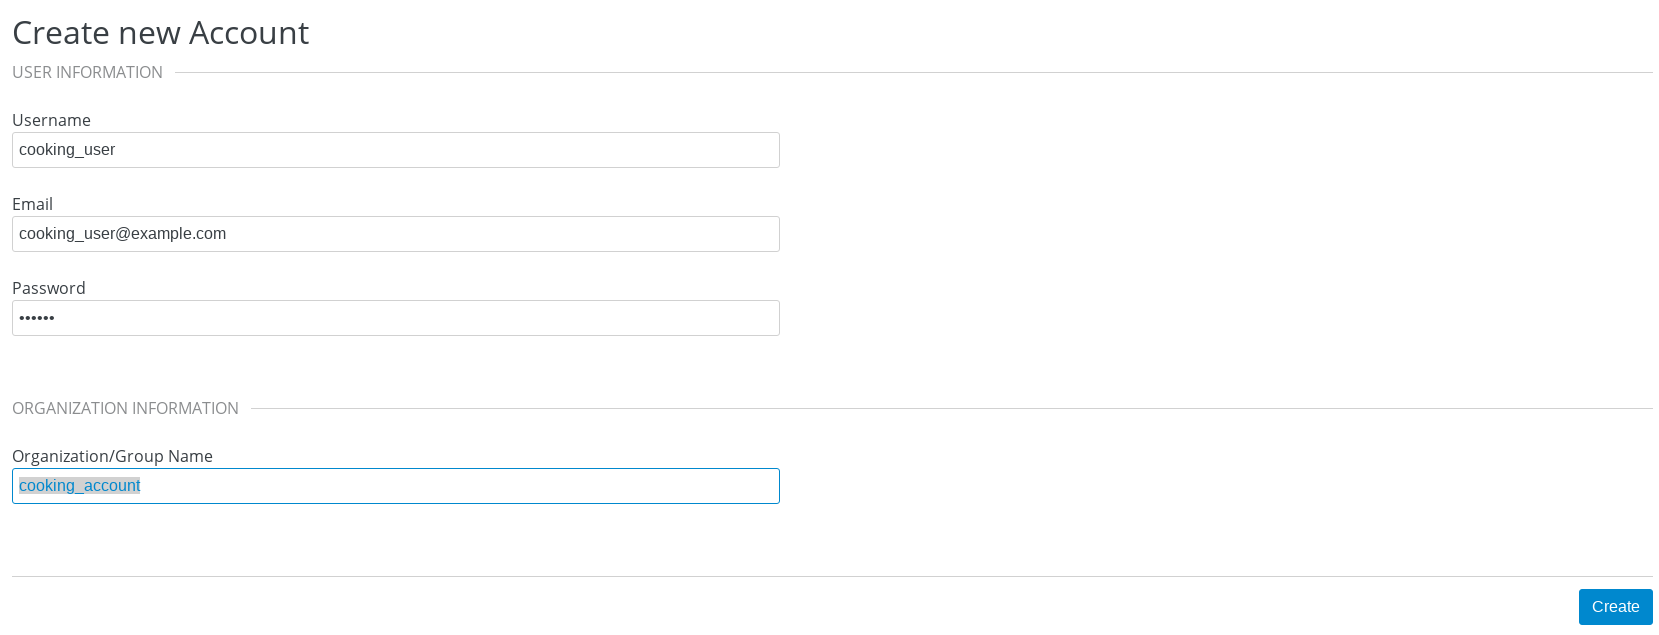
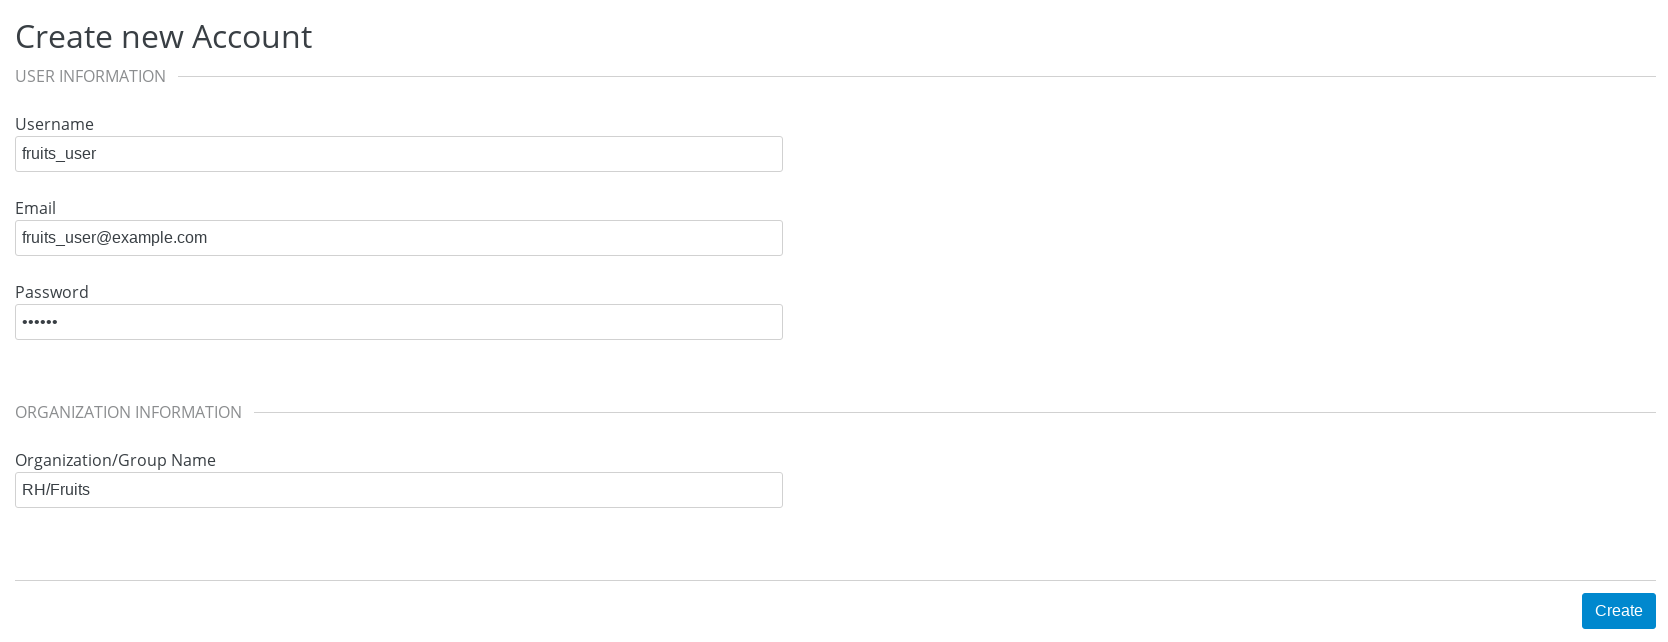
Create按钮,在弹出的 Create new Account 界面填入如下内容-
Username - cooking_user
-
Email - cooking_user@example.com
-
Password - redhat
-
Organization/Group Name - cooking_account
-
-
点击
Create完成创建 -
查看创建的开发者账户,关联了一个应用(自动生成),一个用户,编辑自动生成的应用,并删除
创建 Application
创建 Cooking Basic Application 关联 Basic Application Plan
-
选择
Audience→Accounts→Listing,点击cooking_account -
点击
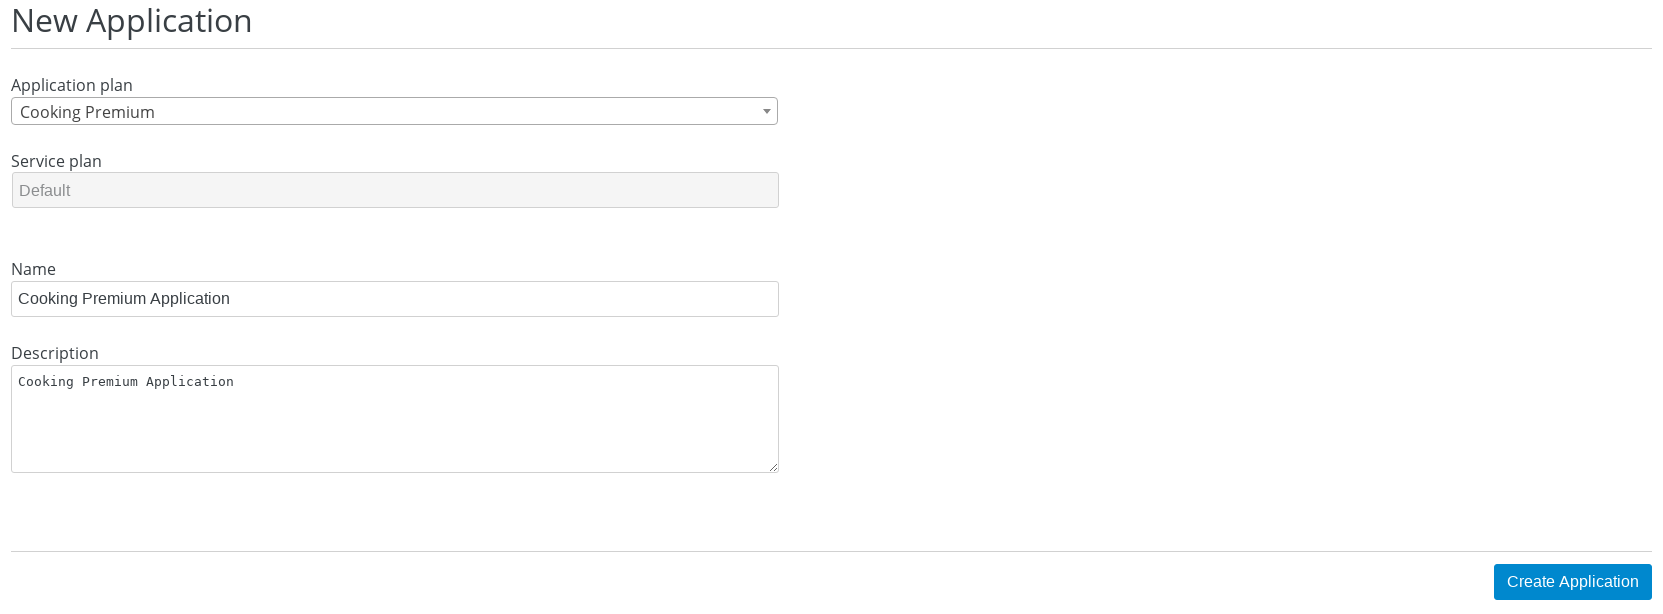
0 Application链接,点击Create Application按钮 -
在 Application plan 下拉单中选择
Cooking Basic -
在 Name 栏输入
Cooking Basic Application -
在 Description 栏输入描述内容

-
点击
Create Application创建应用 -
在 Cooking Basic Application 界面查看,右侧关联的 Application Plan 是 Cooking Basic,API Credentials 部分生成了一个 User Key
-
在
State部分点击Accept按钮,确保状态为 Live
创建 Cooking Premium Application 关联 Premium Application Plan
-
选择
Audience→Accounts→Listing,点击cooking_account -
点击
1 Application链接,点击Create Application按钮 -
在 Application plan 下拉单中选择
Cooking Premium -
在 Name 栏输入
Cooking Premium Application -
在 Description 栏输入描述内容
-
点击
Create Application创建应用 -
在 Cooking Premium Application 界面查看,右侧关联的 Application Plan 是 Cooking Premium,API Credentials 部分生成了一个 User Key
-
在
State部分点击Accept按钮,确保状态为 Live
微服务集成
-
在管理门户中选择
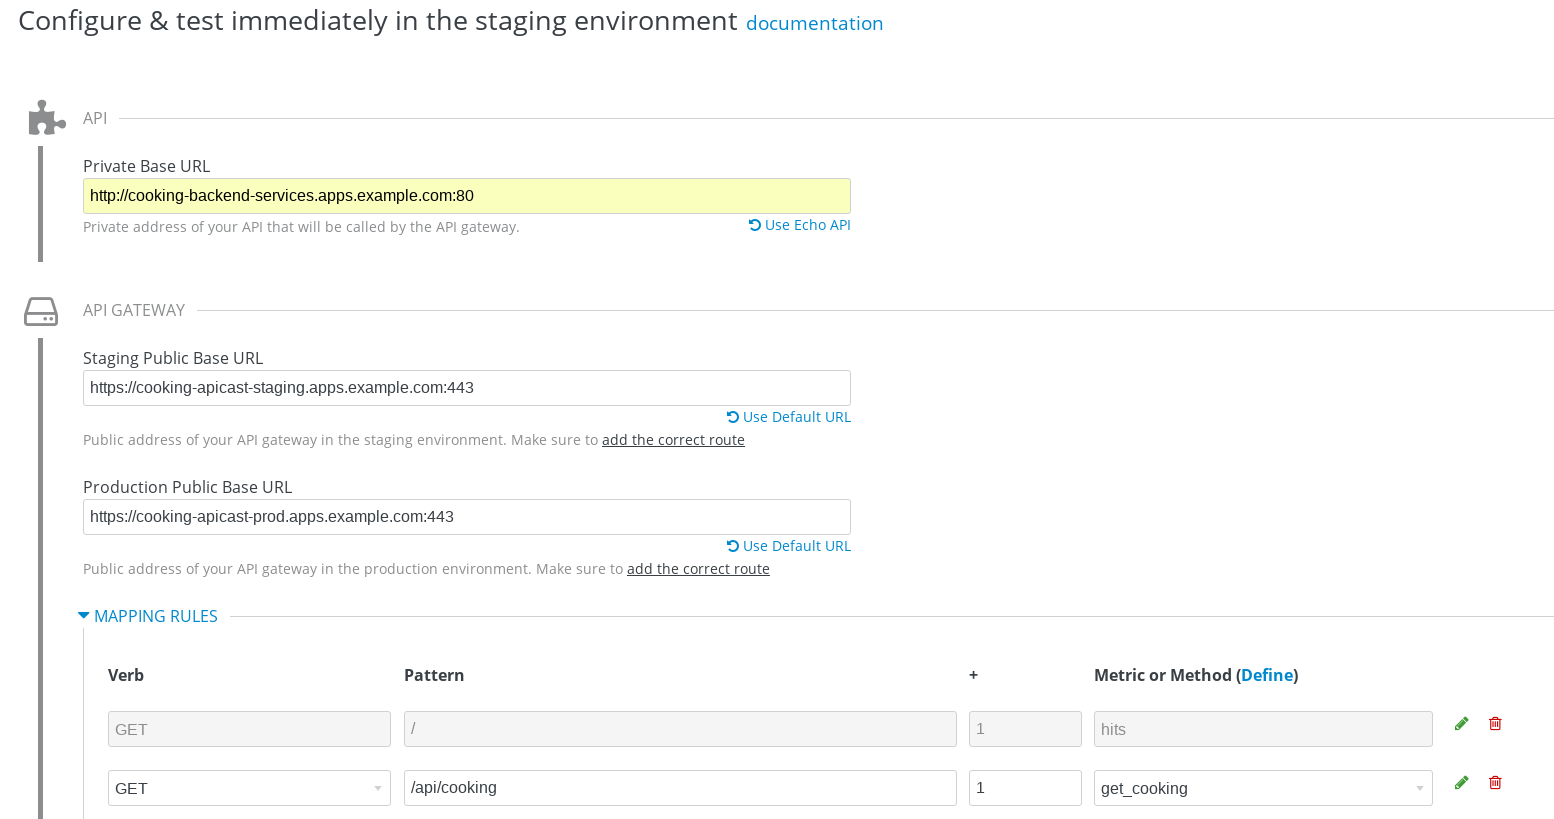
API:Cooking→Integration→Configuration -
点击 Add the base URL of your API and save the configuration 按钮
-
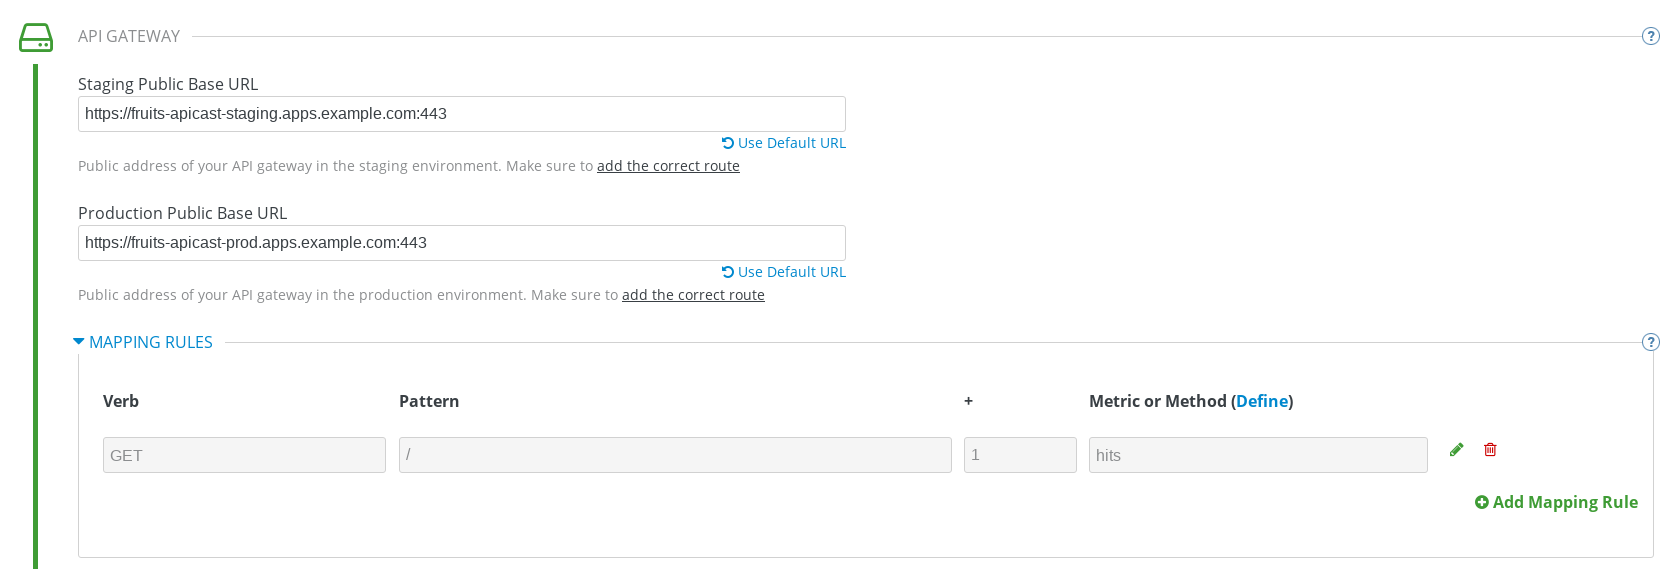
在 Integration 界面填入
-
Private Base URL: http://cooking-backend-services.apps.example.com:80
-
Staging Public Base URL: https://cooking-apicast-staging.apps.example.com:443
-
Production Public Base URL: https://cooking-apicast-prod.apps.example.com:443
-
-
定义 MAPPING RULES:
/api/cooking→get_cooking
-
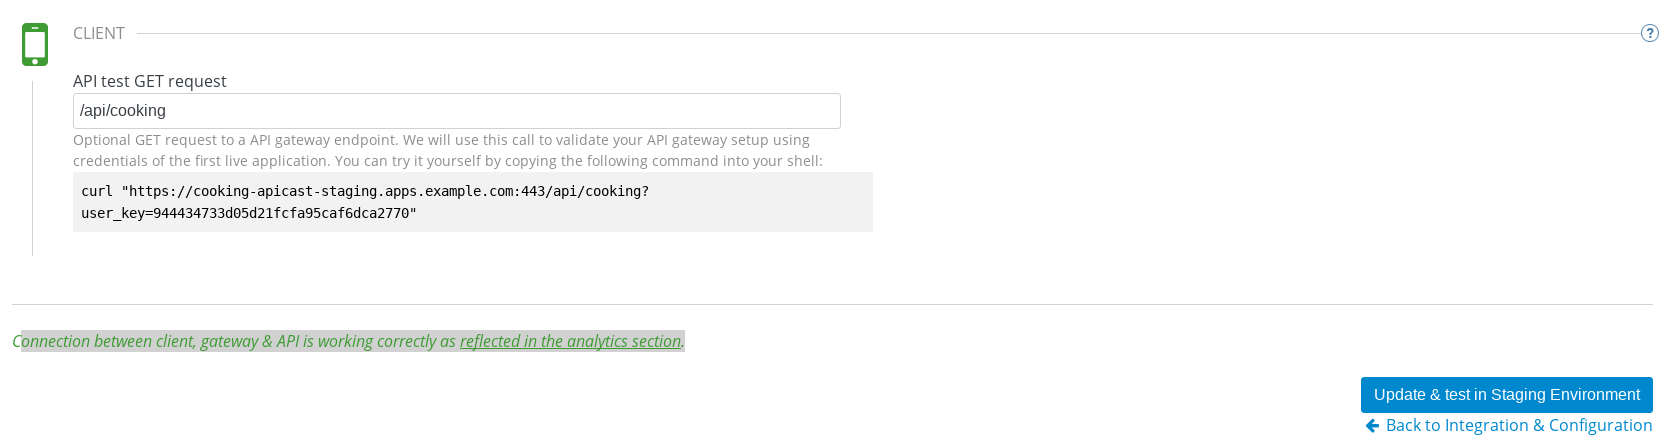
在 Update & test in Staging Environment 部分填入 API test GET request URL 为
/api/cooking -
点击 Update & test in Staging Environment,正确结果如下图
-
点击 Back to Integration & Configuration 返回
-
点击 Promote v. 1 to Production 发布
微服务访问测试
选择 Audience → Application → Listing, 分别点击 Cooking Basic Application 和 Cooking Premium Application,分别记录对应 User Key。
1. 以 Cooking Basic Application 对应的 User Key 访问 cooking 服务 105 次,发现 100 次以后访问受限
$ for i in {1..105} ; do curl -k "https://cooking-apicast-prod.apps.example.com/api/cooking?user_key=944434733d05d21fcfa95caf6dca2770" ; done
...
Limits exceeded
Limits exceeded
Limits exceeded
Limits exceeded
2. 以 Cooking Premium Application 对应的 User Key 访问 cooking 服务 105 次,发现服务一直可以被访问
$ for i in {1..105} ; do curl -k "https://cooking-apicast-prod.apps.example.com/api/cooking?user_key=51fb4712fef863458c8ea355c1b64cbd" ; echo ; doneFruits 服务管理
目的
-
将 Fruits 服务进行管理
-
定义 basic 和 premium 应用计划
-
定义方法和映射
-
将限流策率添加到 basic 计划,控制 API 的访问
-
开发者门户创建
-
API 文档导入
API Gateway 上创建 Stage 和 Prod 路径
# oc create route edge fruits-apicast-prod --service=apicast-production --hostname=fruits-apicast-prod.apps.example.com -n 3scale-amp
# oc create route edge fruits-apicast-staging --service=apicast-staging --hostname=fruits-apicast-staging.apps.example.com -n 3scale-amp|
Note
|
如果不创建 Stage 和 Prod 路径,则在后续服务集成步骤在 3Scale 界面点击创建。 |
创建 Fruits API
-
登录 3Scale 管理门户
-
选择
Dashboard→APIS -
点击
New API链接,开始创建一个 API -
在新弹出的对话框中输入
-
Name -
Fruits -
System name -
fruits_api -
Description -
Fruits API
-

-
点击
Add API按钮完成创建
创建 Application Plan
创建 Basic Application Plan
-
登录管理门户,选择
API:Fruits→Overview -
在 Published Application Plans 部分,点击
Create Application Plan -
Name栏输入 Basic -
System name栏输入 fruits_basic -
Applications require approval?选择 Y -
点击
Create Application Plan按钮创建 Plan

-
在 Application Plans 列表中点击
Publish发布 Basic Plan
创建 Premium Application Plan
-
登录管理门户,选择
API:Fruits→Overview -
在 Published Application Plans 部分,点击
Create Application Plan -
Name栏输入 Premium -
System name栏输入 fruits_premium -
Applications require approval?选择 Y -
点击
Create Application Plan按钮创建 Plan

-
在 Application Plans 列表中点击
Publish发布 Premium Plan -
在 Default Plan 下拉菜单中选择默认 Plan 为 Basic
创建开发者账户
-
登录 3Scale 管理门户
-
选择
Audience→Accounts→Listing -
点击
Create按钮,在弹出的 Create new Account 界面填入如下内容-
Username - fruits_user
-
Email - fruits_user@example.com
-
Password - redhat
-
Organization/Group Name - RH/Fruits
-
-
点击
Create完成创建 -
查看创建的开发者账户,关联了一些应用(自动生成),一个用户,编辑自动生成的应用,并删除
创建 Application
创建 Basic Application 关联 Basic Application Plan
-
选择
Audience→Accounts→Listing,点击RH/Fruits -
点击
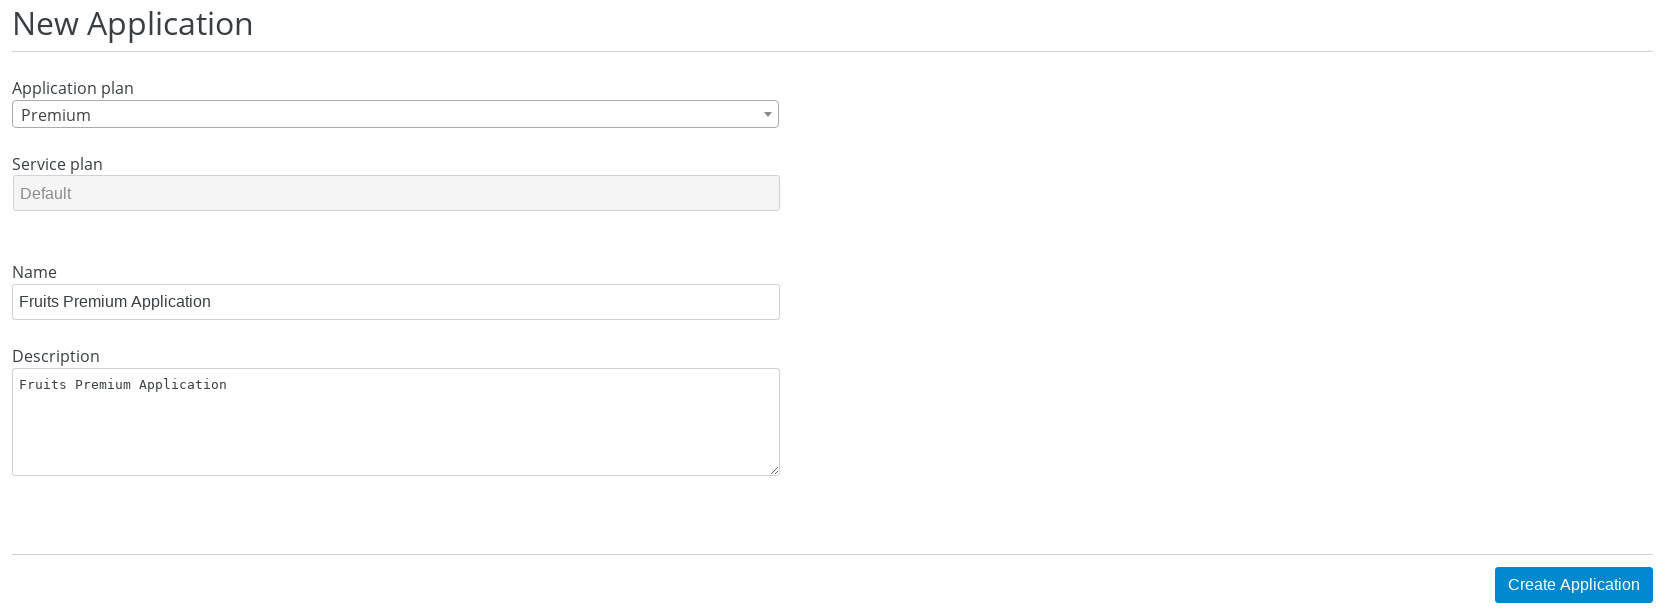
0 Application链接,点击Create Application按钮 -
在 Application plan 下拉单中选择
Basic -
在 Name 栏输入
Fruits Basic Application -
在 Description 栏输入描述内容

-
点击
Create Application创建应用 -
在 Fruits Basic Application 界面查看,右侧关联的 Application Plan 是 Basic,API Credentials 部分生成了一个 User Key
-
在
State部分点击Accept按钮,确保状态为 Live
创建 Premium Application 关联 Premium Application Plan
-
选择
Audience→Accounts→Listing,点击RH/Fruits -
点击
1 Application链接,点击Create Application按钮 -
在 Application plan 下拉单中选择
Premium -
在 Name 栏输入
Fruits Premium Application -
在 Description 栏输入描述内容
-
点击
Create Application创建应用 -
在 Fruits Premium Application 界面查看,右侧关联的 Application Plan 是 Premium,API Credentials 部分生成了一个 User Key
-
在
State部分点击Accept按钮,确保状态为 Live
微服务集成
-
在管理门户中选择
API:Fruits→Integration→Configuration -
点击 Add the base URL of your API and save the configuration 按钮
-
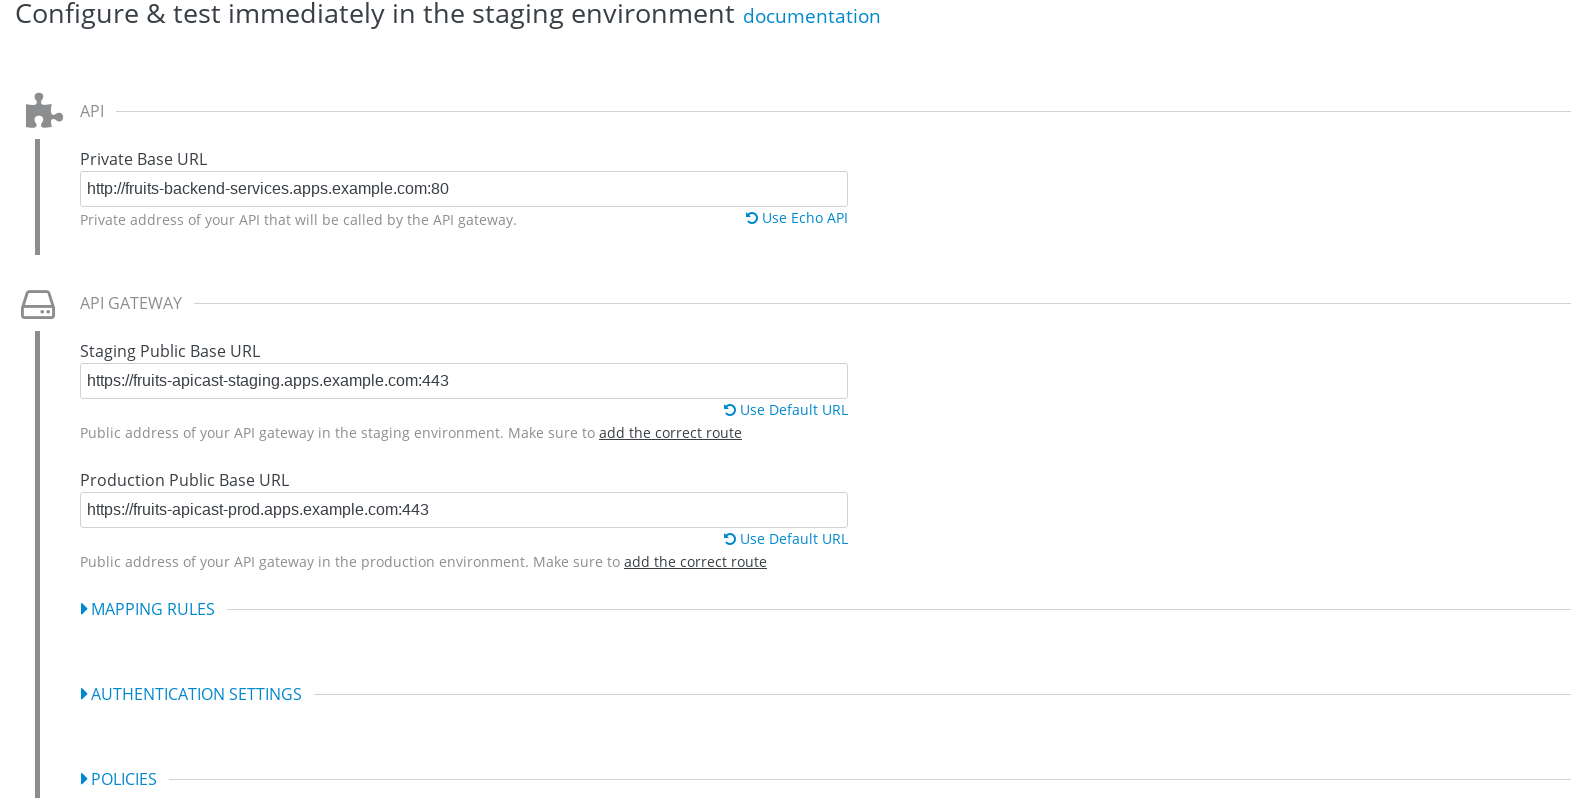
在 Integration 界面填入
-
Private Base URL: http://fruits-backend-services.apps.example.com:80
-
Staging Public Base URL: https://fruits-apicast-staging.apps.example.com:443
-
Production Public Base URL: https://fruits-apicast-prod.apps.example.com:443
-
-
定义 MAPPING RULES:
/api/cooking→get_cooking
-
保持其它配置项目不变
-
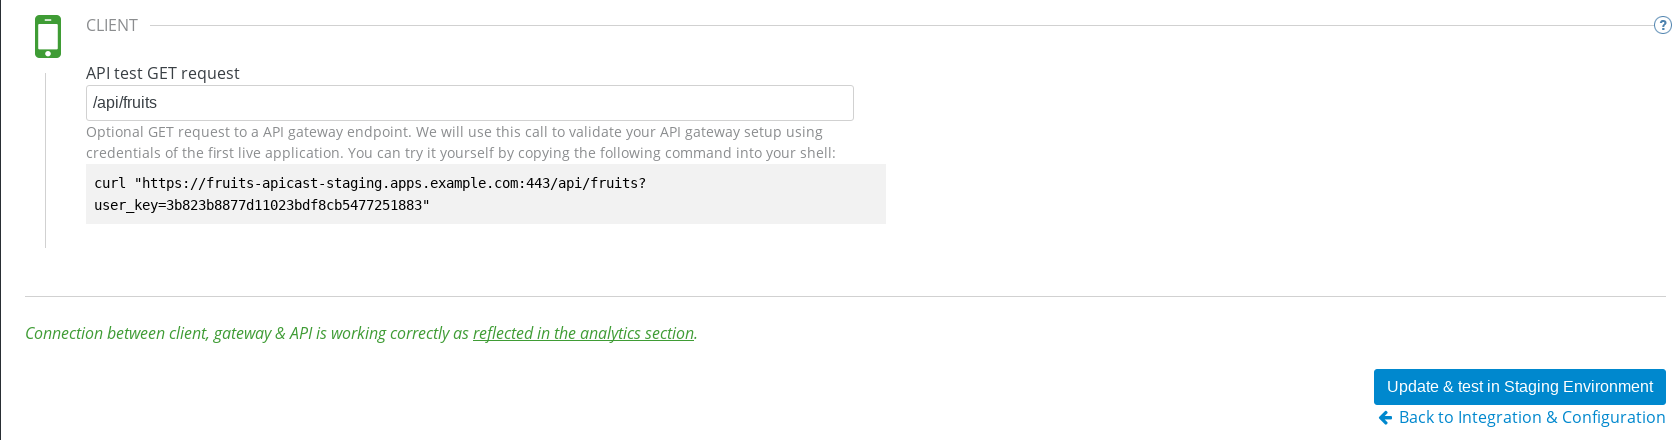
在 Update & test in Staging Environment 部分填入 API test GET request URL 为
/api/fruits -
点击 Update & test in Staging Environment,正确结果如下图
-
点击 Back to Integration & Configuration 返回
-
点击 Promote v. 1 to Production 发布
微服务访问测试
选择 Audience → Application → Listing, 分别点击 Fruits Basic Application 和 Fruits Premium Application,分别记录对应 User Key。
1. 以 Fruits Basic Application 对应的 User Key 访问 Fruits 服务 15 次,发现服务一直可以被访问
$ for i in {1..15} ; do curl -k "https://fruits-apicast-prod.apps.example.com/api/fruits?user_key=3b823b8877d11023bdf8cb5477251883" ; echo ; done
[{"id":1,"name":"Cherry"},{"id":2,"name":"Apple"},{"id":3,"name":"Banana"}]
[{"id":1,"name":"Cherry"},{"id":2,"name":"Apple"},{"id":3,"name":"Banana"}]
[{"id":1,"name":"Cherry"},{"id":2,"name":"Apple"},{"id":3,"name":"Banana"}]
[{"id":1,"name":"Cherry"},{"id":2,"name":"Apple"},{"id":3,"name":"Banana"}]
[{"id":1,"name":"Cherry"},{"id":2,"name":"Apple"},{"id":3,"name":"Banana"}]
[{"id":1,"name":"Cherry"},{"id":2,"name":"Apple"},{"id":3,"name":"Banana"}]
[{"id":1,"name":"Cherry"},{"id":2,"name":"Apple"},{"id":3,"name":"Banana"}]
[{"id":1,"name":"Cherry"},{"id":2,"name":"Apple"},{"id":3,"name":"Banana"}]
[{"id":1,"name":"Cherry"},{"id":2,"name":"Apple"},{"id":3,"name":"Banana"}]
[{"id":1,"name":"Cherry"},{"id":2,"name":"Apple"},{"id":3,"name":"Banana"}]
[{"id":1,"name":"Cherry"},{"id":2,"name":"Apple"},{"id":3,"name":"Banana"}]
[{"id":1,"name":"Cherry"},{"id":2,"name":"Apple"},{"id":3,"name":"Banana"}]
[{"id":1,"name":"Cherry"},{"id":2,"name":"Apple"},{"id":3,"name":"Banana"}]
[{"id":1,"name":"Cherry"},{"id":2,"name":"Apple"},{"id":3,"name":"Banana"}]
[{"id":1,"name":"Cherry"},{"id":2,"name":"Apple"},{"id":3,"name":"Banana"}]
2. 以 Fruits Premium Application 对应的 User Key 访问 Fruits 服务 15 次,发现服务一直可以被访问
$ for i in {1..15} ; do curl -k "https://fruits-apicast-prod.apps.example.com/api/fruits?user_key=e2403e7bc537bfd24aee7e3cfa8b0991" ; echo ; done
[{"id":1,"name":"Cherry"},{"id":2,"name":"Apple"},{"id":3,"name":"Banana"}]
[{"id":1,"name":"Cherry"},{"id":2,"name":"Apple"},{"id":3,"name":"Banana"}]
[{"id":1,"name":"Cherry"},{"id":2,"name":"Apple"},{"id":3,"name":"Banana"}]
[{"id":1,"name":"Cherry"},{"id":2,"name":"Apple"},{"id":3,"name":"Banana"}]
[{"id":1,"name":"Cherry"},{"id":2,"name":"Apple"},{"id":3,"name":"Banana"}]
[{"id":1,"name":"Cherry"},{"id":2,"name":"Apple"},{"id":3,"name":"Banana"}]
[{"id":1,"name":"Cherry"},{"id":2,"name":"Apple"},{"id":3,"name":"Banana"}]
[{"id":1,"name":"Cherry"},{"id":2,"name":"Apple"},{"id":3,"name":"Banana"}]
[{"id":1,"name":"Cherry"},{"id":2,"name":"Apple"},{"id":3,"name":"Banana"}]
[{"id":1,"name":"Cherry"},{"id":2,"name":"Apple"},{"id":3,"name":"Banana"}]
[{"id":1,"name":"Cherry"},{"id":2,"name":"Apple"},{"id":3,"name":"Banana"}]
[{"id":1,"name":"Cherry"},{"id":2,"name":"Apple"},{"id":3,"name":"Banana"}]
[{"id":1,"name":"Cherry"},{"id":2,"name":"Apple"},{"id":3,"name":"Banana"}]
[{"id":1,"name":"Cherry"},{"id":2,"name":"Apple"},{"id":3,"name":"Banana"}]
[{"id":1,"name":"Cherry"},{"id":2,"name":"Apple"},{"id":3,"name":"Banana"}]|
Note
|
虽然服务可以被访问,但没有对其进行调运统计及增加限制,随后的部分将添加 Methods,Mappings,Rate Limiting 等进行 API 调运统计归纳,及访问限制。 |
定义 Methods
在管理门户中选择 API:Fruits → Integration → Methods & Metrics,
在 Methods & Metrics 视图下可以定义 Methods 及 Metrics,Methods 是和后端 API 进行映射,Metrics 是指管理策略的定义,具体包括:Hits、megabytes、CPU time 等。
-
在 Methods 列表右端点击
New method -
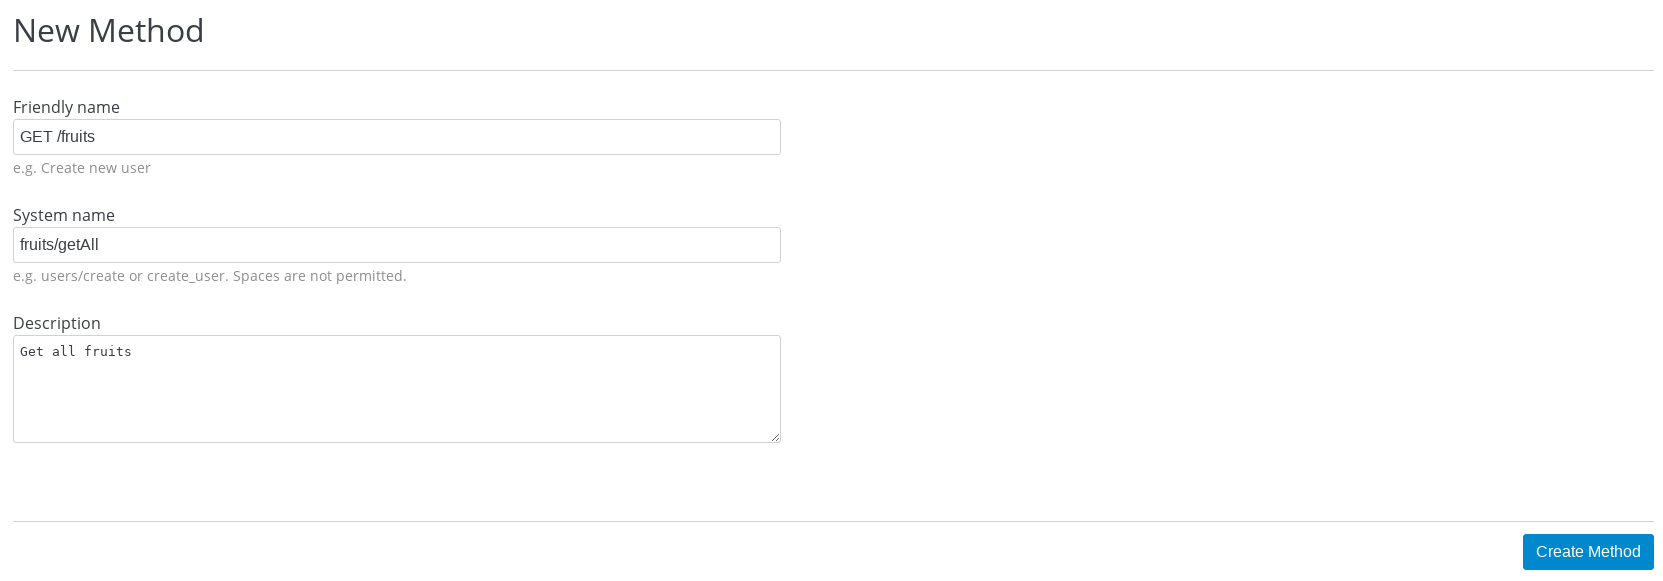
在弹出的界面中输入:
-
Friendly name- GET /fruits -
System name- fruits/getAll -
Description- Get all fruits
-
-
点击
Create Method按钮 -
创建完成后 Methods 列表中会有一个 GET /fruits, 出现。
-
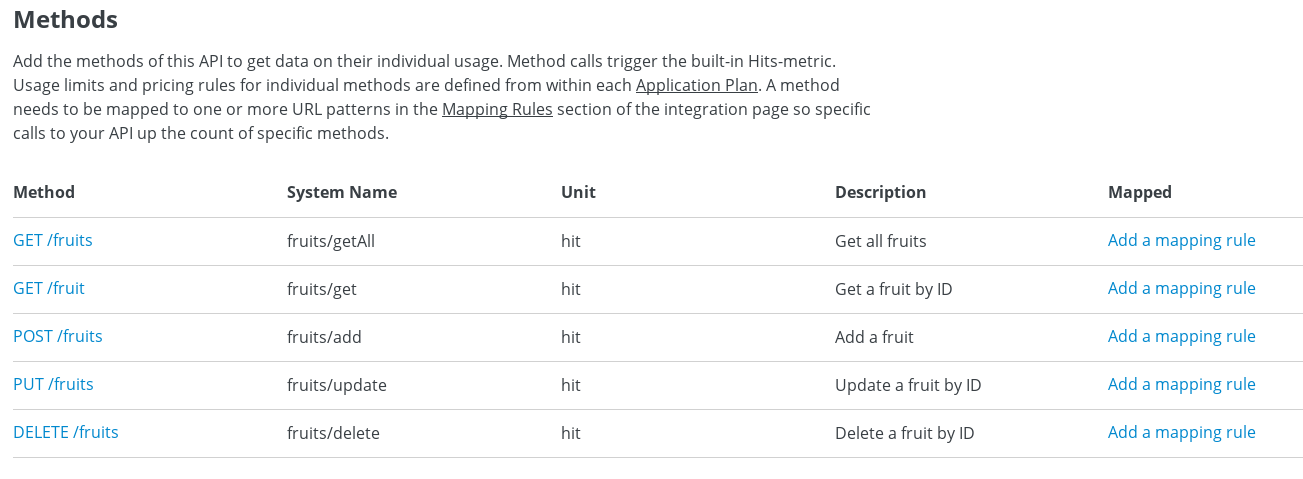
重复以上步骤,添加下表中所有 Methods
| Friendly name | System name | Description |
|---|---|---|
GET /fruit |
fruits/get |
Get a fruit by ID |
POST /fruits |
fruits/add |
Add a fruit |
PUT /fruits |
fruits/update |
Update a fruit by ID |
DELETE /fruits |
fruits/delete |
Delete a fruit by ID |
-
完成后定义的 Methods 列表如下图
-
Metrics 定义使用默认定义,仅收集 Hits 数据,及只收集 API 访问次数的记录。
定义 Mappings 规则
-
在管理门户中选择
API:Fruits→Integration→Methods & Metrics,在 Methods 列表中GET /fruits行点击 Add a mapping rule 链接,则会重定向到API GATEWAY→MAPPING RULES部分
-
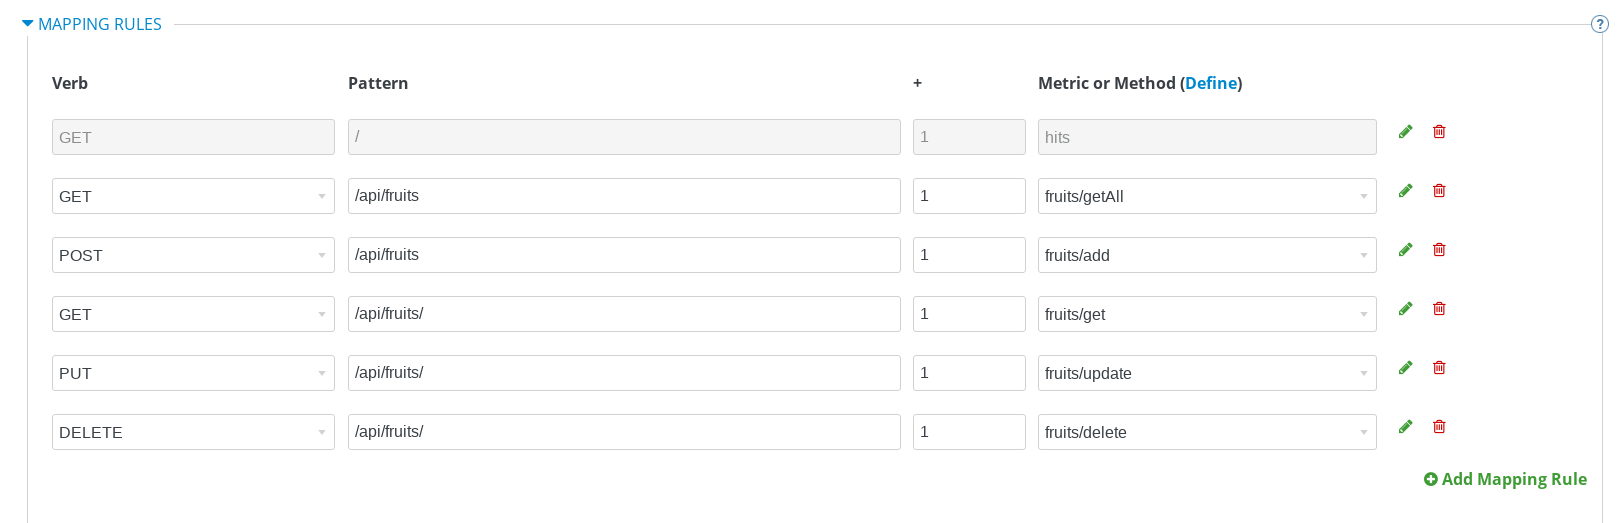
重复点击 Add Mapping Rule 按钮多次,一次定义 Mappings 规则与前面创建的 Methods 对应,且每次输入内如如下表
| Verb | Pattern | Method |
|---|---|---|
GET |
/api/fruits |
fruits/getAll |
POST |
/api/fruits |
fruits/add |
GET |
/api/fruits/ |
fruits/get |
PUT |
/api/fruits/ |
fruits/update |
DELETE |
/api/fruits/ |
fruits/delete |
-
点击 Update & test in Staging Environment,正确结果如下图
-
点击 Back to Integration & Configuration 返回
-
点击 Promote v. 2 to Production 发布
设定 Rate Limits
-
在管理门户,选择
API:Fruits→Overview→Published Application Plans -
选择
Basic -
滑动鼠标到
Metrics, Methods, Limits & Pricing Rules部分 -
点击 POST, PUT, DELETE 对应的绿色对号,Disable 掉 Basic Plan 添加、更新、删除 Fruit 的能力
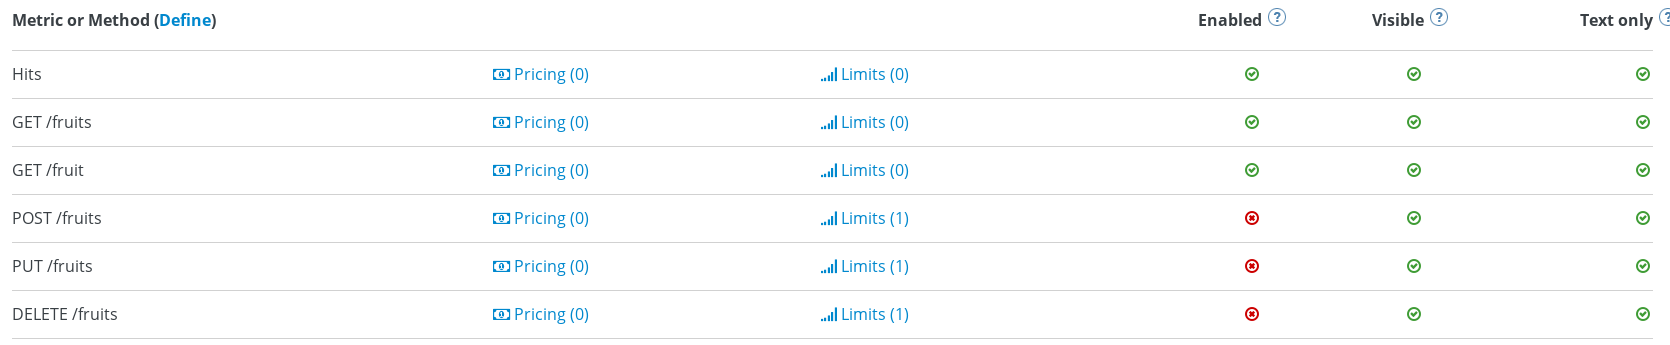
GET /fruits 设计 Rate Limits
-
基于
GET /fruits方法行,点击Limits (0) -
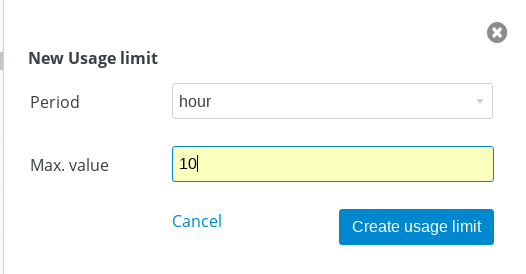
点击
New Usage limit按钮,添加如下值-
Period -
hour -
Max. value -
10
-
-
点击 Create usage limit 按钮,创建 Basic 计划每小时允许访问查询所有 Fruits 10 次
-
重复上面步骤,创建 Basic 计划每分钟允许访问查询所有 Fruits 2 次
GET /fruit 设计 Rate Limits
-
基于
GET /fruits方法行,点击Limits (0) -
点击
New Usage limit按钮,添加如下值-
Period -
hour -
Max. value -
100
-

-
点击 Create usage limit 按钮,创建 Basic 计划每小时允许访问查询所有 Fruits 100 次
-
重复上面步骤,创建 Basic 计划每分钟允许访问查询所有 Fruits 5 次
-
点击 Update Application plan 更新应用计划
测试 Rate Limits
选择 Audience → Application → Listing, 分别点击 Fruits Basic Application 和 Fruits Premium Application,分别记录对应 User Key。
Basic Application 对应的 User Key 进行 CRUD 操作
1. 连续执行查询所有 Fruits
$ for i in {1..5} ; do curl -k "https://fruits-apicast-prod.apps.example.com/api/fruits?user_key=3b823b8877d11023bdf8cb5477251883" ; echo ; done
[{"id":1,"name":"Cherry"},{"id":2,"name":"Apple"},{"id":3,"name":"Banana"}]
[{"id":1,"name":"Cherry"},{"id":2,"name":"Apple"},{"id":3,"name":"Banana"}]
[{"id":1,"name":"Cherry"},{"id":2,"name":"Apple"},{"id":3,"name":"Banana"}]
Limits exceeded
Limits exceeded
2. 连续执行根据 ID 查询 Fruits
$ for i in {1..10} ; do curl -k "https://fruits-apicast-prod.apps.example.com/api/fruits/1?user_key=3b823b8877d11023bdf8cb5477251883" ; echo ; done
{"id":1,"name":"Cherry"}
{"id":1,"name":"Cherry"}
{"id":1,"name":"Cherry"}
Limits exceeded
Limits exceeded
Limits exceeded
Limits exceeded
Limits exceeded
Limits exceeded
Limits exceeded
3. 创建一个 Fruits
$ curl -k -X POST --header 'Content-Type: application/json' --header 'Accept: application/json' -d '{"id": 11, "name": "mongo"}' 'https://fruits-apicast-prod.apps.example.com/api/fruits?user_key=3b823b8877d11023bdf8cb5477251883'
Limits exceeded
4. 更新一个 Fruits
$ curl -k -X PUT --header 'Content-Type: application/json' --header 'Accept: application/json' -d '{"id": 11, "name": "mongo"}' 'https://fruits-apicasmple.com/api/fruits/10?user_key=3b823b8877d11023bdf8cb5477251883'
Limits exceeded
5. 删除
$ curl -k -X DELETE --header 'Accept: application/json' 'https://fruits-apicast-prod.apps.example.com/api/fruits/11?user_key=3b823b8877d11023bdf8cb5477251883'
Limits exceeded
Premium Application 对应的 User Key 进行 CRUD 操作
1. 连续执行查询所有 Fruits
$ for i in {1..5} ; do curl -k "https://fruits-apicast-prod.apps.example.com/api/fruits?user_key=e2403e7bc537bfd24aee7e3cfa8b0991" ; echo ; done
[{"id":1,"name":"Cherry"},{"id":2,"name":"Apple"},{"id":3,"name":"Banana"}]
[{"id":1,"name":"Cherry"},{"id":2,"name":"Apple"},{"id":3,"name":"Banana"}]
[{"id":1,"name":"Cherry"},{"id":2,"name":"Apple"},{"id":3,"name":"Banana"}]
[{"id":1,"name":"Cherry"},{"id":2,"name":"Apple"},{"id":3,"name":"Banana"}]
[{"id":1,"name":"Cherry"},{"id":2,"name":"Apple"},{"id":3,"name":"Banana"}]
2. 连续执行根据 ID 查询 Fruits
$ for i in {1..10} ; do curl -k "https://fruits-apicast-prod.apps.example.com/api/fruits/1?user_key=e2403e7bc537bfd24aee7e3cfa8b0991" ; echo ; done
{"id":1,"name":"Cherry"}
{"id":1,"name":"Cherry"}
{"id":1,"name":"Cherry"}
{"id":1,"name":"Cherry"}
{"id":1,"name":"Cherry"}
{"id":1,"name":"Cherry"}
{"id":1,"name":"Cherry"}
{"id":1,"name":"Cherry"}
{"id":1,"name":"Cherry"}
{"id":1,"name":"Cherry"}
3. 创建一个 Fruits
$ curl -k -X POST --header 'Content-Type: application/json' --header 'Accept: application/json' -d '{"id": 11, "name": "mongo"}' 'https://fruits-apicast-prod.apps.example.com/api/fruits?user_key=e2403e7bc537bfd24aee7e3cfa8b0991'
{"id":11,"name":"mongo"}
4. 更新一个 Fruits
$ curl -k -X PUT --header 'Content-Type: application/json' --header 'Accept: application/json' -d '{"id": 11, "name": "mongoDB"}' 'https://fruits-apicast-prod.apps.example.com/api/fruits/11?user_key=e2403e7bc537bfd24aee7e3cfa8b0991'
{"id":11,"name":"mongoDB"}
5. 删除
$ curl -k -X DELETE --header 'Accept: application/json' 'https://fruits-apicast-prod.apps.example.com/api/fruits/11?user_key=e2403e7bc537bfd24aee7e3cfa8b0991'OAI 2.0 文档编辑
1. 编辑 14 -16行,host 修改为 public api URL,及添加 schema 为 https
host: 'fruits-apicast-prod.apps.example.com:443'
basePath: /
schemes:
  - https
2. 所有 GTE/POST/PUT/DELETE 接口添加如下 Parameter 定义
      parameters:
        - name: user_key
          in: query
          description: Your API access key
          required: true
          x-data-threescale-name: user_keys
          type: string
3. 将编辑完的文件以 JSON 格式导出
OAI 2.0 文档导入
-
选择
API:Fruits→ActiveDocs -
在文档列表右侧点击
Create your first spec-
Name -
Fruits API Specification -
System name -
fruits_spec -
选择
Publish -
Description -
This is the Fruits API Specification. -
API JSON Spec - 拷贝 上面步骤导除的 JSON 文件内容
-
-
点击 Create Service 按钮完成文档创建
Booking 服务管理
目的
本部分是对 API 网关的个性化定制,基于两个流行的插件,通过定义策略链的方式,实现 API 网关
-
日志记录
-
IP 检测
API Gateway 上创建 Stage 和 Prod 路径
|
Note
|
本部分内容可选择,如果不创建,则在后续服务集成步骤在 3Scale 界面点击创建。 |
oc create route edge booking-apicast-prod --service=apicast-production --hostname=booking-apicast-prod.apps.example.com -n 3scale-amp
oc create route edge booking-apicast-staging --service=apicast-staging --hostname=booking-apicast-staging.apps.example.com -n 3scale-amp
创建 Booking API
-
登录 3Scale 管理门户
-
选择
Dashboard→APIS -
点击
New API链接,开始创建一个 API -
在新弹出的对话框中输入
-
Name -
Booking -
System name -
booking_api -
Description -
Booking API
-
-
点击
Add API按钮完成创建
定义 Methods 及 Metrics
在管理门户中选择 API:Booking → Integration → Methods & Metrics,
在 Methods & Metrics 视图下可以定义 Methods 及 Metrics,Methods 是和后端 API 进行映射,Metrics 是指管理策略的定义,具体包括:Hits、megabytes、CPU time 等。
-
在 Methods 列表右端点击
New method -
在弹出的界面中输入:
-
Friendly name- GET /booking -
System name- get_booking -
Description- Booking GET endpoint that returns list of bookings
-
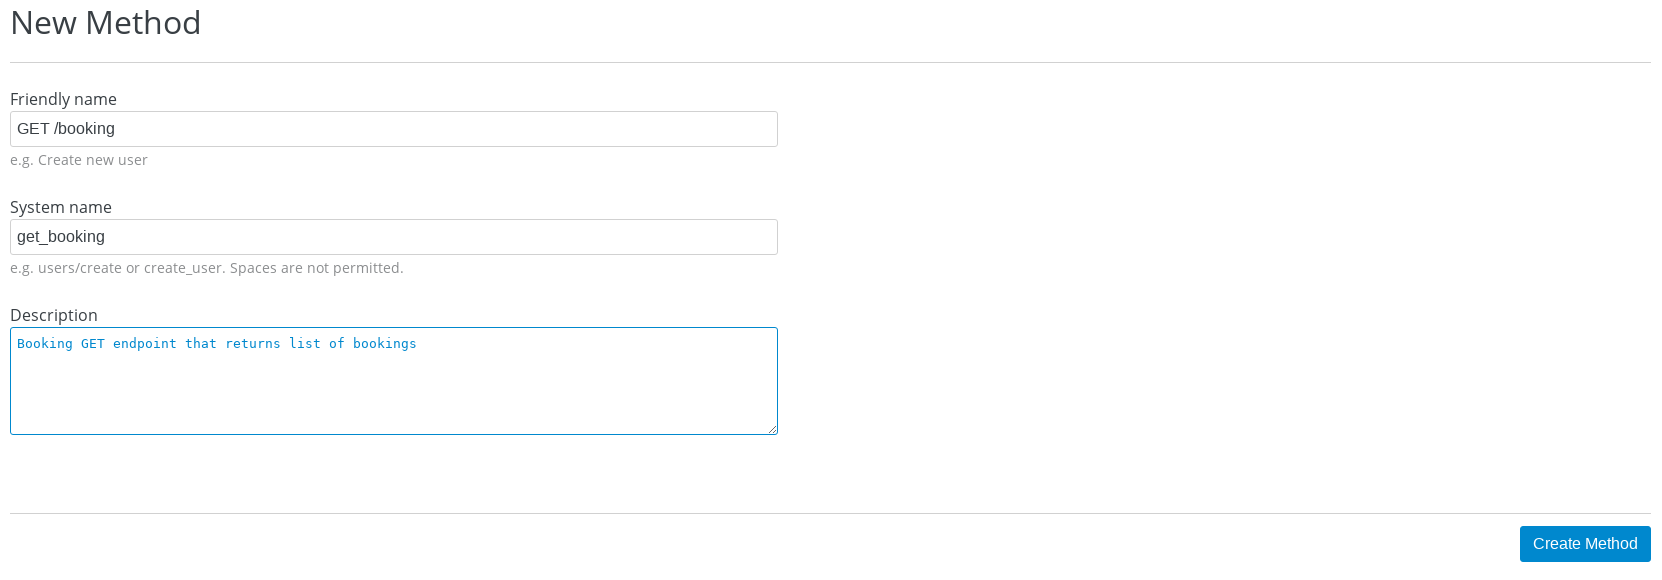
 点击 `Create Method` 按钮
* 创建完成后 Methods 列表中会有一个 GET /booking, 出现。
* Metrics 定义使用默认定义,仅收集 Hits 数据,及只收集 API 访问次数的记录。
创建 Application Plan
-
登录管理门户,选择
API:booking→Overview -
在 Published Application Plans 部分,点击
Create Application Plan -
Name栏输入 Basic -
System name栏输入 booking_basic -
Applications require approval?选择 Y -
点击
Create Application Plan按钮创建 Plan -
在 Application Plan 列表中点击 Publish 链接发布
-
在 Default Plan 中选择 Basic
创建开发者账户
-
登录 3Scale 管理门户
-
选择
Audience→Accounts→Listing -
点击
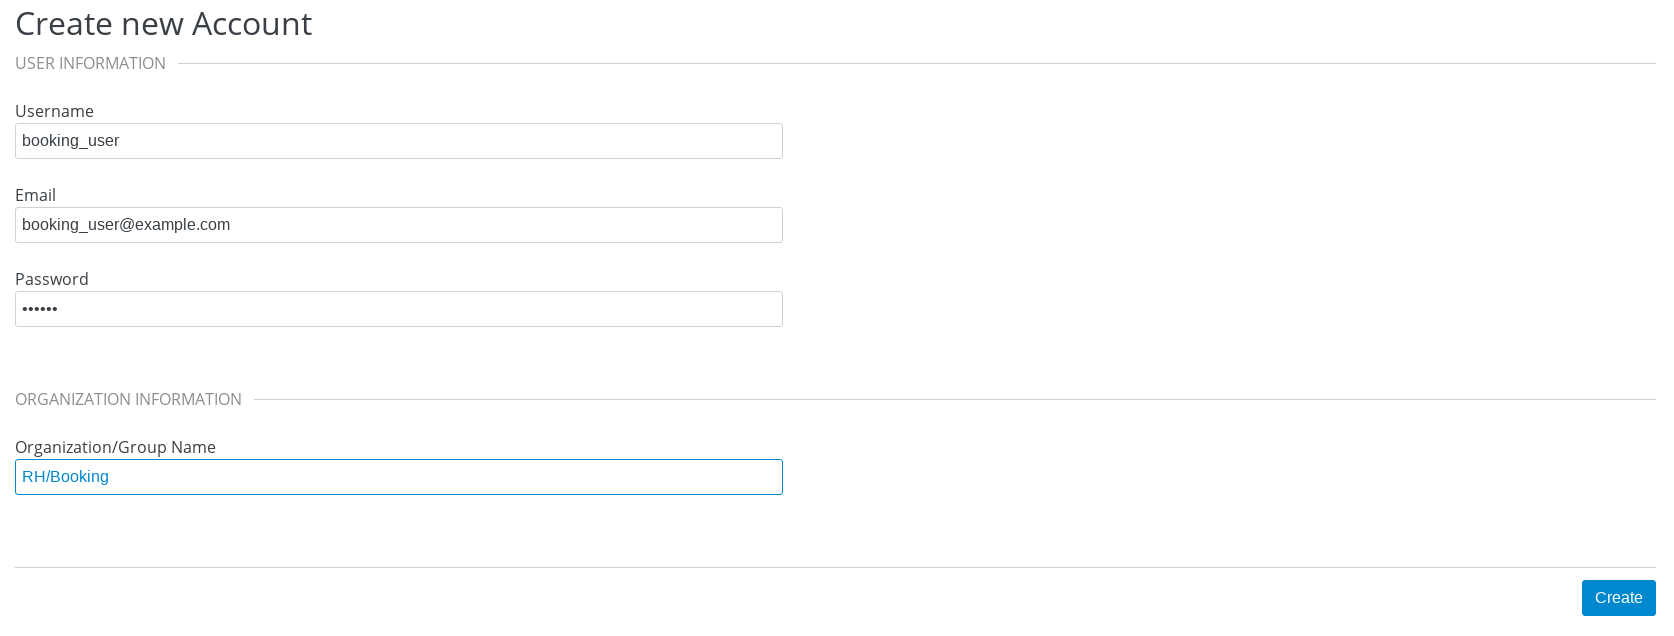
Create按钮,在弹出的 Create new Account 界面填入如下内容-
Username - booking_user
-
Email - booking_user@example.com
-
Password - redhat
-
Organization/Group Name - RH/Booking
-
-
点击
Create完成创建
|
Note
|
账户创建完成后会自动创建一个 App,并关联默认 Basic 计划。 |
微服务集成
-
在管理门户中选择
API:Booking→Integration→Configuration -
点击 Add the base URL of your API and save the configuration 按钮
-
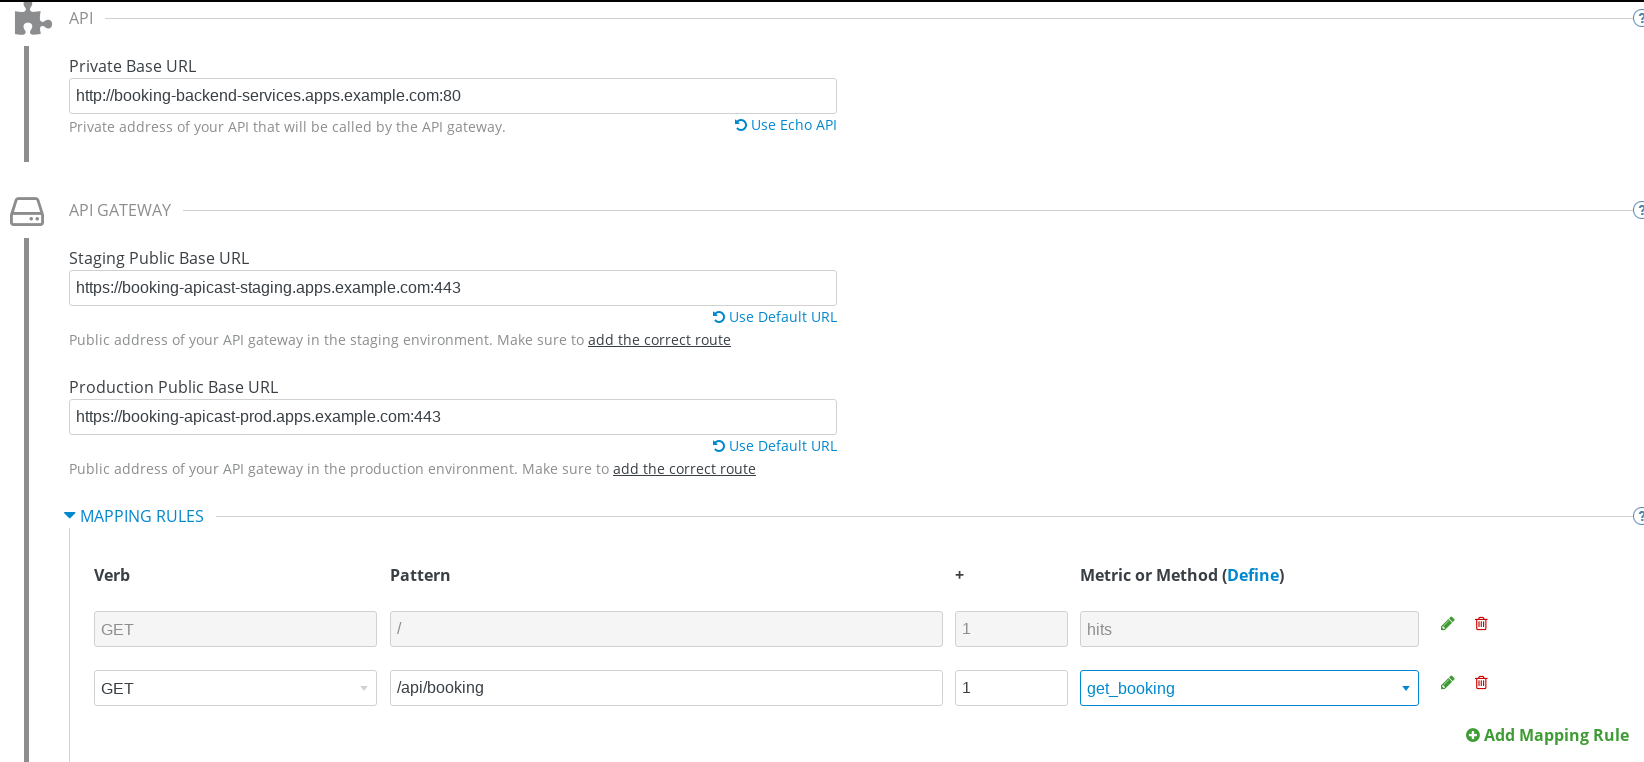
在 Integration 界面填入
-
Private Base URL: http://booking-backend-services.apps.example.com:80
-
Staging Public Base URL: https://booking-apicast-staging.apps.example.com:443
-
Production Public Base URL: https://booking-apicast-prod.apps.example.com:443
-
-
定义 MAPPING RULES:
/api/booking→get_booking
-
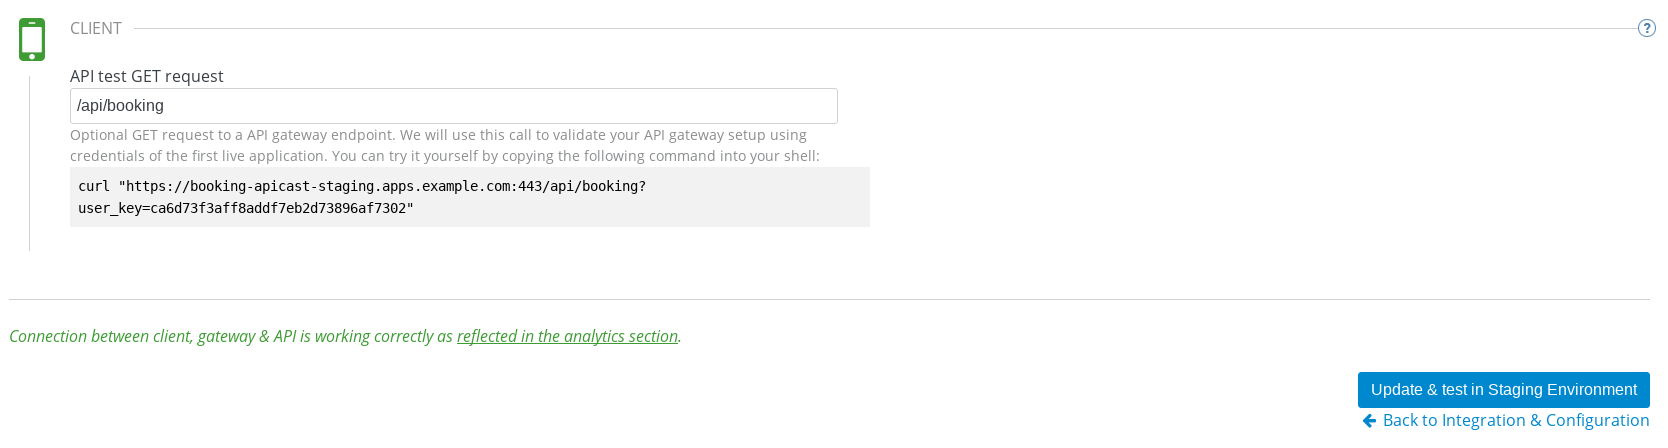
在 Update & test in Staging Environment 部分填入 API test GET request URL 为
/api/booking -
点击 Update & test in Staging Environment,正确结果如下图
-
点击 Back to Integration & Configuration 返回
-
点击 Promote v. 1 to Production 发布
微服务访问测试
选择 Audience → Application → Listing, 点击 RH/Booking’s App,记录 User Key。使用此 User Key,执行如下 GET 调运 10 次。
$ for i in {1..10} ; do curl -k "https://booking-apicast-prod.apps.example.com/api/booking?user_key=ca6d73f3aff8addf7eb2d73896af7302" ; echo ; done
{"booking":"ROW10086"}
{"booking":"ROW10086"}
{"booking":"ROW10086"}
{"booking":"ROW10086"}
{"booking":"ROW10086"}
{"booking":"ROW10086"}
{"booking":"ROW10086"}
{"booking":"ROW10086"}
{"booking":"ROW10086"}
{"booking":"ROW10086"}
Logging Policy 设置
-
在管理门户中选择
API:Booking→Integration→Configuration -
点击
edit APIcast configuration链接 -
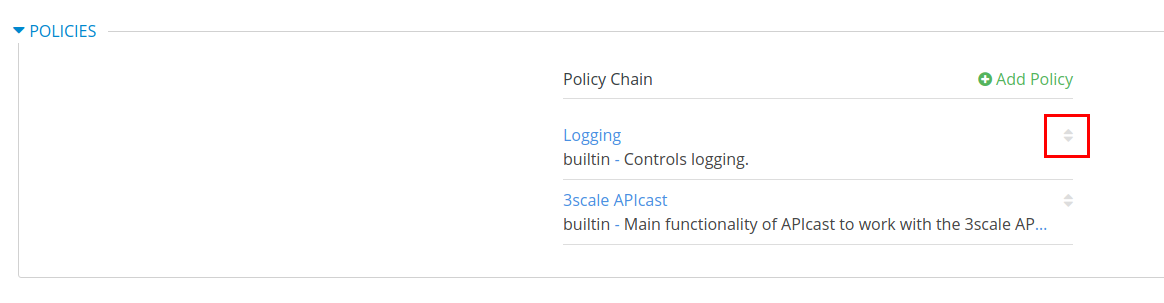
滑动鼠标到
POLICIES部分,点击 Add Policy 按钮

-
点击选择
Logging -
拖动
Logging策略,使之在3scale Apicast之前
-
点击
Logging策略,展开更多配置项目,选择enable_access_logs
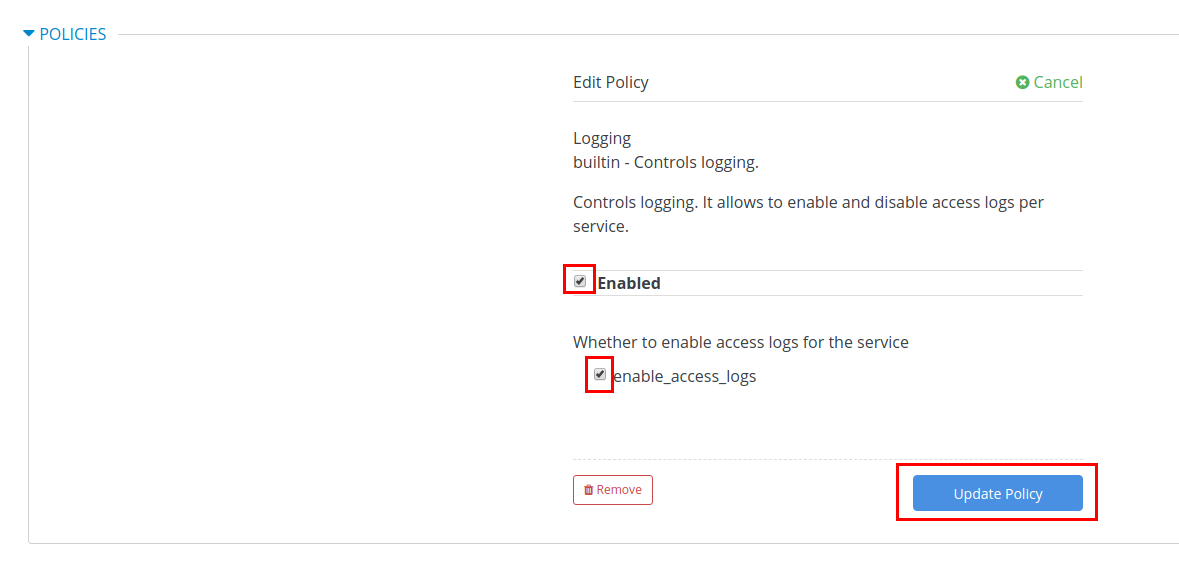
-
点击 Update Policy 按钮完成 Logging 策略设置
-
点击 Update and test in Staging Environment 测试配置
Logging Policy 测试
1. 重新部署 stage-apicast
oc rollout latest dc/apicast-staging2. Staging URL 访问 Booking Service
$ curl -k "https://booking-apicast-staging.apps.example.com/api/booking?user_key=ca6d73f3aff8addf7eb2d73896af7302"
{"booking":"ROW10086"}
3. stage-apicast 容器上查看 access 日志
[26/Jan/2019:00:22:49 +0000] booking-apicast-staging.apps.example.com:8080 10.244.6.1:51846 "GET /api/booking?user_key=ca6d73f3aff8addf7eb2d73896af7302 HTTP/1.1" 200 22 (0.052) 0IP Check Logging Policy 设置
-
在管理门户中选择
API:Booking→Integration→Configuration -
点击
edit APIcast configuration链接 -
滑动鼠标到
POLICIES部分,点击 Add Policy 按钮 -
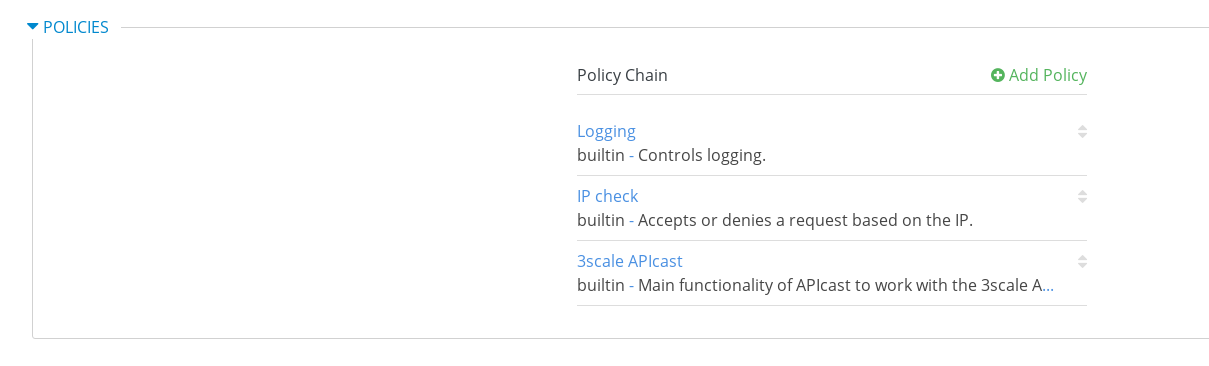
在下拉的 Policy 列表中选择
IP Check -
点击选择
IP Check -
拖动
IP Check策略,使之在3scale Apicast之前,Logging策略之后
-
点击
IP Check策略,展开更多配置项目,配置如下所示, Block 10.66.208.101 IP 地址服务器发送请求。
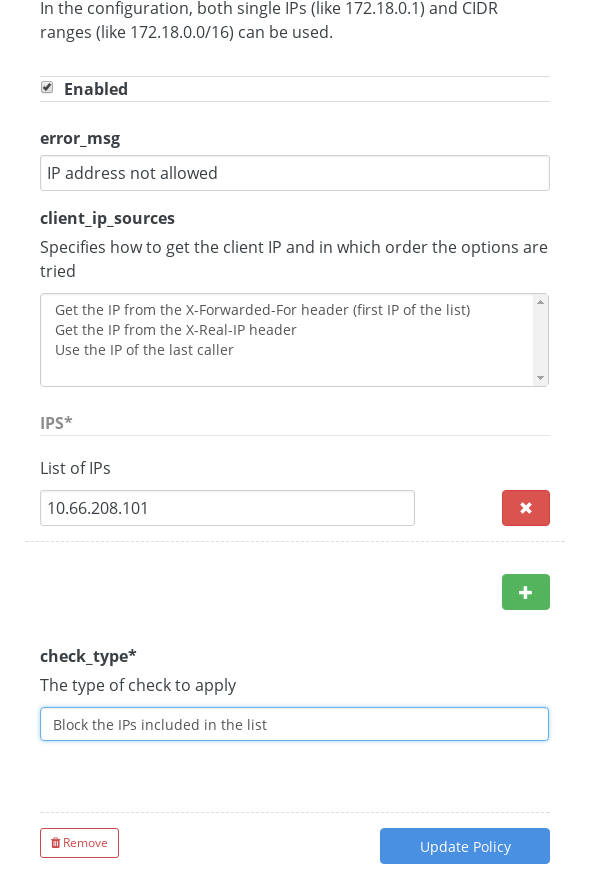
-
点击 Update Policy 按钮完成 IP Check 策略设置
-
点击 Update and test in Staging Environment 测试配置
IP Check Logging Policy 测试
1. 重新部署 stage-apicast
oc rollout latest dc/apicast-staging2. 在 10.66.208.101 服务器上使用 Staging URL 访问 Booking Service
$ curl -k "https://booking-apicast-staging.apps.example.com/api/booking?user_key=ca6d73f3aff8addf7eb2d73896af7302"
IP address not allowed